NOTE: I have written
these instructions for the crocheter who has never tried to crochet or is still a beginner.
Therefore, in most cases, I have gone into detail about how many loops
are left on the hook after
each step in hopes to make learning the stitches
a bit easier.
If you need information on
this page
but do not want to print the numerous pages
you can copy and paste the instructions you need
into MS Word or Notepad and print that way.
Copy and paste the following
web address to the same page
so you can come back if you additional stitch information:
http://www.crochetnmore.com/123basics.htm
Special hooks are used that are much longer
than ordinary hooks to make room for the large number of stitches. It
is very important to check the number of stitches on the hook at the end
of each row from right to left, because it is very easy to sk the last
st at the end of the row.
NOTE: The right side of the work is always
facing you.
Step 1: Make a base chain with the required
number of stitches (no extra turning chain). Insert hook in 2nd ch from
hook and draw through a lp. Leave this lp on the hook. Pull a lp through
each ch, leaving them on the hook, to the end of the row.
Step 2: Work the return row from left to
right. Do not turn the work. YO and draw lp through the first lp on
the hook. YO and draw lp through the next 2 lps on the hook. Continue
drawing through 2 lps to end of row. ~Return Row~
Step 3: Do not turn the work. Work from
right to left. Skip the first vertical lp formed at the edge of the
work in previous row. Insert hook from right to left behind the next vertical
lp. Yo and draw yarn through the vertical lp. Leave this lp on hook.
Continue in this way to end. make sure you do not sk the last vertical
lp on left-handed side of work.
Repeat Steps 2 & 3 till project is desired
length.
Instead of crocheting in the entire stitch
which is both loops on the top of the stitch... you only catch or go through
one of the loops when you do each stitch.
The back loop (bl) is the loop farthest from
you.
Insert hook from the back side from right
to left around post of st on previous row, complete the indicated stitch.
BPDC
BACK POST DOUBLE CROCHET
Yarn over, insert hook from the back side
of the work right to left around the post of the indicated stitch on a
previous row;
yo and pull up a loop (3
lps on hook)
yo and draw through two lps (2
lps on hook)
yo and draw through two lps (1
lp on hook)
Yarn over, insert hook from the back side
of the work right to left around the post of the indicated stitch on
a previous row;
yo and pull up a loop (3 lps on
hook)
yo and draw through all three lps
BPSC
BACK POST SINGLE CROCHET
Insert hook from the back
side of the work right to left around the post of the indicated stitch
on a previous row; yo and pull up a loop, yo and draw through two lps.
BP TR
BACK POST TREBLE
Yarn over twice, insert hook from the back
side of the work right to left around the post of the indicated stitch
on a previous row;
yo and draw up a lp (4 lps on hook)
yo and draw through two lps (3 lps on hook)
yo and draw through two lps (2
lps on hook)
yo and draw through two lps (1
lp on hook)
NO ABBREV.
BEAD STITCH
a/k/a Berry Stitch
Insert hook in st indicated, yo
and pull up lp, (holding back last lp on hook, yo and pull through first
lp on hook only) 3 times, yo and pull through both lps on hook.
With beads already
threaded onto the yarn/thread...
Pull up one bead then chain 1.
BEG
BEGINNING
Beg is used in crochet patterns
to let you know what part of the pattern you are working on.
BEG LINKED DC
BEGINNING LINKED DOUBLE CROCHET
Ch3, insert hook in the second chain from the hook, yarn over and draw up a loop (2 lps on hook)
Insert hook in the same st as the beginning ch3 and draw up a loop (3lps on hook).
(Yarn over, draw through 2 loops) twice.
NOTE: I begin a row of linked double crochet stitches by working the very first one in the same stitch as the beginning chains to avoid having to work into the top of the beginning chain on the opposite end of the row. This makes it easier to keep your stitch count correct and it's easier to place the stitches.
See below
for instructions to work additional LINKED-DC stitches on a row.
BEG LINKED TR (BEG LTR)
BEGINNING
LINKED
TREBLE
CROCHET
Ch4, insert hook in the second chain from the hook,
yarn over and draw up a loop (2 lps on hook)
Insert hook in the next chain, yarn over and draw up a loop
(3 lps on hook)
Insert hook in the same st as the beginning ch4 and draw up a loop (4lps on hook).
(Yarn over, draw through 2 loops) three times.
NOTE: I begin a row of linked treble crochet stitches by working the very first one in the same stitch as the beginning chains to avoid having to work into the top of the beginning chain on the opposite end of the row. This makes it easier to keep your stitch count correct and it's easier to place the stitches.
See below
for instructions to work additional LINKED-TR stitches on a row.
BET
Between
Crochet stitches can be worked in several ways: into both loops, front loop only, back loop only, around posts, etc. When a pattern calls for you to work "between" stitches... crochet in between the posts of the indicated stitches.
Yarn over
insert hook in space indicated
yarn over
draw loop through
yarn over
draw through 2 loops on the hook
(yarn over,
insert hook in same space,
yarn over,
draw loop through
yarn over,
draw through 2 loops on hook)
4 times
yarn over,
draw through all 6 loops on hook
ch 1
Though similar a popcorn stitch, a bobble stitch is created by working a series of incomplete stitches and all of those stitches are joined at the top. Popcorn Stitches are worked using completed stitches the first and last stitches being joined to complete the stitch.
Broomstick Lace is done with a
large knitting needle or broomstick.
Using
a crochet hook the loops are made one at a time and then placed onto
the broomstick needle. Loops are worked off of the broomstick needle
by removing them in sets and crocheting into them.
Broomstick lace can be altered
to suite your taste. Instead of doing 4 loops per section you might
want to do 5. Use your imagination. Just remember... if you pull off
4 loops (like in the square pattern) you must do 4 stitches into those
loops. If you pull off 5 loops you must do 5 stitches into the loops,
etc.
With the slip knot on your hook, yarn over
and draw through the loop that is already on your hook. Continue this
for how many chains you need to begin your project.
The first row of a crochet project begins
with a series of chain stitches.
Always work in the second chain from the
hook for a single crochet.
Always work in the third chain from the hook for a half double crochet.
Always work in the fourth chain from the hook for a double crochet.
Always work in the fifth chain from
the hook for a treble crochet.
When working into the chain you can either
insert your hook under the top strand of each chain (the method most
people use) or into the back ridge, "the hump", of each chain
(sometimes referred to as camel crochet).
Patterns sometimes
refer to a chain space.. it can be chain 1 or any number/series of chains.
Ch-1 sp is the same as chain one space.
Ch2-sp is the same as chain two space.
etc.
Example: If a pattern says "sc in next ch-1 sp" then you do
a single crochet in the next chain one space (the next space where you
previously chained one). Work the stitch into the hole below the chain...
not directly into the chain itself.
Working from bottom of pattern:
Twist ch-8 lps, starting with first skipped
ch-8 on starting ch, working vertically across ch-8 lps to last row,
fold first ch-8 lp left to right forming a loop. With crochet hook,
draw next ch-8 lp through, twisting left over right. Continue working
in this manner across to last row. Secure last loop with bobby pin or
clothes pin. Repeat this procedure on each ch-8 lp across.
CL
CLUSTER
There are variations of the cluster stitch
but basically it means there is more than one stitch clustered together.
As an example: If you were doing a 3 double crochet cluster you would
do each double crochet without completing the last step (you would have
2 loops on the hook after the first dc, 3 loops on the hook after the
second dc and 4 loops on the hook when all three dcs are completed. Then
you yarn over and draw through all of the loops. That is what "Clusters"
the stitch.
You can cross regular crochet stitches by skipping one stitch, working a stitch in the next stitch, then working a stitch in the skipped stitch. Double Crochet and Treble Crochet stitches are normally used.
There are several variations of decrease
stitches. Decreasing can be done by one of two methods...
1) skipping stitches
2) do two or more stitches within one step
of completion then draw through all loops on hook
DNT
DO NOT TURN
DC
DOUBLE CROCHET
Yarn over and insert your hook into the
stitch or space indicated.
Yarn over and pull up a loop. (3 loops
on hook.)
Yarn over and draw through 2 of the loops. (2 loops on hook.)
Yarn over and draw through
the last 2 of the loops.
Work a dc in the next stitch without completing
the very last step (leave the last two loops on the hook), then dc in the
next stitch without completing the last step. You should have three loops
on the hook then yarn over and draw through all the loops. Decrease made.
Work a dc in the next stitch without completing
the very last step (leave the last two loops on the hook)
DC in the
next stitch without completing the last step. You should have three loops
on the hook.
Dc in the
next stitch without completing the last step. You should have FOUR loops
on the hook.
Yarn over and draw through all the loops.
Decrease made.
DBL SHELL
DOUBLE SHELL STITCH
(2 dc, ch 2, 2 dc, ch 2, 2 dc) in next st
or ch sp.
DTR
DOUBLE TREBLE
Yarn over three times, then insert your hook
into the stitch or space indicated. Yarn over and pull up a loop. (You
should have five loops on your hook.) Yarn over and draw through two loops.
(You should have four loops on your hook.) Yarn over and draw through
two loops. (You should have three loops on your hook.) Yarn over and draw
through two loops. (You should have two loops on your hook.) Yarn over
and draw through two loops.
Omitting the last step of each dtr, dtr in the first stitch,
dtr in the second stitch, YO, draw through all 3 lps on hook.
THE UNABBREVIATED INSTRUCTIONS:
Begin your first Double Treble:
Yarn over three times,
insert your hook into the stitch or space indicated.
Yarn over and pull up a loop. (You should have five loops on your hook.)
Yarn over and draw through two loops. (You should have four loops on
your hook.)
Yarn over and draw through two loops. (You should have three loops on
your hook.)
Yarn over and draw through two loops. (You should have two loops on
your hook.)
Do not finish this stitch... you should leave the two loops on your
hook
Begin your next Double Treble:
Yarn over three times,
insert your hook into the stitch or space indicated.
Yarn over and pull up a loop. (You should have 6 loops on your hook.)
Yarn over and draw through two loops. (You should have 5 loops on your
hook.)
Yarn over and draw through two loops. (You should have 4 loops on your
hook.)
Yarn over and draw through two loops. (You should have 3 loops on your
hook.)
Yarn over and draw through all 3 loops.
NOTE: You can cluster more than two stitches... simply complete
each additional stitch without completing the last step, then yarn over
and draw through all loops remaining on the hook to cluster them all.
EDC
EXTENDED DOUBLE CROCHET
Yo, insert hook into
stitch, yo, pull through stitch (3 lps on hook), yo, pull through 1 loop,
(still have 3 lps on hook) yo, pull through 2 lps, (2 lps on hook), yo, pull
through remaining 2 loops.
Yo, insert hook into
stitch, yo, pull through stitch (3 lps on hook), yo, pull through 1 loop,
(still have 3 lps on hook) yo, pull through remaining 3 loops.
Insert hook in next
ch, yo, draw a loop through (2 loops on hook), yo, draw through one lp
on the hook (2 loops still on hook), yo, draw through both loops on the
hook.
Yo twice, insert hook into
stitch, yo, pull through stitch (4 lps on hook), yo, pull through 1 loop,
(still have 4 lps on hook) yo, pull through 2 lps, (3 lps on hook), yo, pull through 2 lps, (2 lps on hook) yo, pull
through remaining 2 loops.
Once you complete
your last stitch on a project you will have one loop on your hook.
Cut the yarn leaving about a 4-6" tail to be woven in.
Yarn over, draw the yarn tail completely through the loop, and pull
it tight.
This secures the yarn so the project doesn't unravel.
Now you need to weave in the yarn tail using
a crochet hook or a yarn needle.
The yarn needle is quicker and you can weave the strand in without disturbing
the stitches.
1. Work five treble crochet into one stitch
leaving the last loop of each treble crochet on the hook.
2. Yarn over and draw through all the loops
on the hook.
More bulky bobbles can be secured with an
exta chain stitch. If this is necessary it would be indicated within
the pattern.
FL or FLO
FRONT LOOP
Instead of crocheting
in the entire stitch which is both loops on the top of the stitch... you
only catch or go through one of the loops when you do each stitch.
The front loop (fl) is the loop closest to you.
Insert hook from the front side from right
to left around post of st on previous row, complete the indicated stitch.
FPDC
FRONT POST DOUBLE CROCHET
(a/k/a
Front Raised
Double Crochet)
Yarn over, insert hook from the front side
of the work right to left around the post of the indicated stitch on
a previous row;
yo and pull up a loop (3 lps on
hook)
yo and draw through two lps (2
lps on hook)
yo and draw through two lps (1
lp on hook)
Yarn over, insert hook from the front side
of the work right to left around the post of the indicated stitch on
a previous row;
yo and pull up a loop (3 lps on
hook)
yo and draw through all three lps
FP SC
FRONT POST SINGLE CROCHET
Insert hook from the front
side of the work right to left around the post of the indicated stitch
on a previous row;
yo and pull up a loop, yo and draw through two lps.
FP TR
FRONT POST TREBLE
Yarn over twice, insert hook from the front
side of the work right to left around the post of the indicated stitch
on a previous row;
yo and draw up a lp (4 lps on hook)
yo and draw through two lps (3 lps on hook)
yo and draw through two lps (2
lps on hook)
yo and draw through two lps (1
lp on hook)
FSC
FOUNDATION SINGLE CROCHET
For any project that requires a foundation row of all single crochets you can use Foundation Single Crochets. In other words, instead of making a series of chain stitches and then working a single crochet into each chain you work a series of FSC stitches.
To begin a Foundation Single Crochet row, Chain 2.
Insert hook into the second chain from the hook
yarn over and draw a loop through (2 lps on hook)
chain 1
(2 lps still on hook)
yarn over and draw through two loops to finish the foundation single crochet.
* Insert hook into last chain made, yarn over and draw a loop through. (2 lps on hook)
Chain 1. (2 lps still on hook)
Yarn over and draw through two loops to finish the foundation single crochet.
Repeat from the asterisk * for as many stitches as you need for your project.
For any project that requires a foundation row of all half double crochets you can use Foundation Half Double Crochets. In other words, instead of making a series of chain stitches and then working a half double crochet into each chain you work a series of FHDC stitches.
To begin a Foundation Half Double Crochet row, Chain 3.
Yarn over
Insert hook into the third chain from the hook
yarn over and draw a loop through (3 lps on hook)
chain 1
(3 lps still on hook)
yarn over and draw through all three loops to finish the foundation half double crochet.
*
Yarn over
Insert hook into last chain made,
yarn over and draw a loop through. (3 lps on hook)
Chain 1. (3 lps still on hook)
Yarn over and draw through all three loops to finish the foundation half double crochet.
Repeat from the asterisk * for as many stitches as you need for your project.
For any project that requires a foundation row of all double crochets you can use Foundation Double Crochets. In other words, instead of making a series of chain stitches and then working a double crochet into each chain you work a series of FDC stitches.
To begin a Foundation Double Crochet row, Chain 4.
Yarn over
Insert hook into the fourth chain from the hook
yarn over and draw a loop through (3 lps on hook)
chain 1
(3 lps still on hook)
yarn over and draw through two loops
yarn over and draw through two loops
to finish the foundation double crochet.
*
Yarn over
Insert hook into last chain made,
yarn over and draw a loop through. (3 lps on hook)
Chain 1. (3 lps still on hook)
yarn over and draw through two loops
yarn over and draw through two loops
to finish the foundation double crochet.
Repeat from the asterisk * for as many stitches as you need for your project.
For any project that requires a foundation row of all treble crochets you can use Foundation Treble Crochets. In other words, instead of making a series of chain stitches and then working a treble crochet into each chain you work a series of FTR stitches.
To begin a Foundation Treble Crochet row, Chain 5.
Yarn over twice
Insert hook into the fifth chain from the hook
yarn over and draw a loop through (4 lps on hook)
chain 1
(4 lps still on hook)
yarn over and draw through two loops
yarn over and draw through two loops
yarn over and draw through two loops
to finish the foundation treble crochet.
*
Yarn over twice
Insert hook into last chain made,
yarn over and draw a loop through. (4 lps on hook)
Chain 1. (4 lps still on hook)
yarn over and draw through two loops
yarn over and draw through two loops
yarn over and draw through two loops
to finish the foundation treble crochet.
Repeat from the asterisk * for as many stitches as you need for your project.
Gauge refers to the measurement of stitches
and rows contained in a stitch pattern sample. Always begin your gauge
swatch with the recommended hook size and yarn then adjust the hook
size as needed. Be sure to make your swatch large enough to get a proper
measurement.
To measure the stitch gauge... lay the ruler
horizontally across the work.
Row gauge... lay the ruler vertically across the work.
The measurements of your gauge swatch lets
you know if your gauge meets what is recommended for your pattern. If
it doesn't measure up like the pattern says then you should adjust your
hook size accordingly...
too many stitches in your measurement... switch to a larger hook
too few stitches... switch to a smaller hook
Keep in mind... if your project isn't for a garment or an item that
needs to be the approximate suggested size in the pattern instructions...
then checking the gauge isn't as critical.
Yarn over and insert your hook into the stitch
or space indicated,
yarn over and pull up a loop. (You should have 3 loops on your hook.)
Yarn over again and draw through all three of the loops on the hook.
Work a hdc in the next stitch without completing
the very last step (keep all three loops on hook) , then hdc in the next
stitch without completing the last step. You should have 5 loops on the
hook then yarn over and draw through all the loops. Decrease made.
When you see this, work the indicated stitches
in the same space as the joining stitch on the previous round.
IFO
INVISIBLE
FINISH OFF
An interesting way of finishing off a granny square or other motif
so there's no bump
on the side of it.
INC
INCREASE
When you increase you are only adding extra
stitches.
Example: If the row you just completed has
12 stitches and you need to add 3 stitches evenly, then you should do
an extra stitch in the 3rd, 6th and 9th stitch to make the pattern even.
LSC
LONG SINGLE CROCHET
(a/k/a Spike Stitch)
Insert hook in indicated stitch, yo, draw
a loop through (2 loops on hook), yo, draw through both loops on the hook.
A Long Single Crochet Stitch
is worked the same as a regular single crochet stitch, except... it
is worked in a stitch on a row below the normal working row.
Yarn over and insert your hook into the
stitch or space indicated.
Yarn over and pull up a loop. (3 loops
on hook.)
Yarn over and draw through 2 of the loops. (2 loops on hook.)
Yarn over and draw through
the last 2 of the loops.
A Long Double Crochet Stitch
is worked the same as a regular double crochet stitch, except... it
is worked in a stitch on a row below the normal working row.
LINKED DC
not a standard abbreviation
LINKED DOUBLE CROCHET
Insert hook in lower
horizontal bar on same stitch,
yarn over, draw loop through,
insert hook in next st on row you are working,
yarn over, draw loop through,
(yarn over, draw loop through 2 loops on hook) 2 times.
NOTE: Refer to BEG LINKED-DC to see how to begin a row of linked double crochet stitches.
L TR
LINKED TREBLE
Insert hook in upper
horizontal loop of last stitch made.
Yarn over, draw loop through, (2 loops on hook)
insert hook in lower horizontal loop on same stitch,
yarn over, draw loop through, (3 loops on hook)
insert hook in next st on row you are working,
yarn over, draw loop through, (4 loops on hook)
(yarn over, draw loop through 2 loops on hook) 3 times.
Loops are a series of chains in a pattern.
For example: 3 chains in a pattern may be referred to as a chain 3 loop
(ch-3 lp) later in the pattern.
LP ST
LOOP STITCH
Insert the hook in the next st,
grab the working yarn in a clockwise motion from left to right,
looping the working yarn over your finger or a large knitting needle.
Grab the working yarn and draw it through the stitch.
Drop the loop to the back of the crochet fabric.
Yarn over and draw through remaining loops on the hook.
Make your foundation chain an odd number
of chains.
Row 1: Sc in 3rd ch from hook. * ch 1, skip
next ch, sc in next ch *. Repeat from * across. Ch 2 (counts as turning
chain and first chain 1). Turn.
Row 2: Skip first sc, * sc in next ch 1
sp, ch 1, skip next sc *. Repeat from * across.
End this row with a sc in the top of the
beg ch 2 of previous row. Ch 2. Turn.
Pat is the abbreviation for "pattern".
Some crochet pattern designers will tell
you to
continue "working in pattern" for
so many stitches
and/or rows. You simply continue the same
stitches
you were doing before until the designer
tells you to work different stitches.
P
PICOT
Ch 3, sl st in 3rd ch from hook.
(that's it... the picot makes a little bump
in the piece you're crocheting)
This means you need to mark the indicated
stitch. Use a short strand of a contrasting color yarn or a split ring
marker... even a paper clip or latch pin will work. Just put either of
these around the stitch you are indicated to mark and then continue with
the pattern. The instructions should tell you when to reposition or remove
the marker.
The standard popcorn stitch is worked as
follows:
Work 5 double crochets in the chain or stitch indicated.
Drop the loop from the hook.
Insert
the hook in the top of the first double crochet of the 5-dc group.
Pick up the dropped loop.
Draw through the stitch.
Ch1.
Now you can "pop" the popcorn to the right or wrong side of the work
as needed.
Yo, insert hookin next st, yo, draw up 1/2"
long lp, (yo, insert hookin same st, yo, draw up 1/2" long lp) 2 times,
yo draw through first 7 lps on hook, ch 1.
QTR
Quadruple Treble Crochet
yarn over 5 times (6 loops on hook)
insert your hook in the stitch and pull up a loop
(7 loops on hook)
yarn over and draw through 2 loops (6 loops on hook)
yarn over and draw through 2 loops (5 loops on hook)
yarn over and draw through 2 loops (4 loops on hook)
yarn over and draw through 2 loops (3 loops on hook)
yarn over and draw through 2 loops (2 loops on hook)
yarn over and draw through 2 loops (1 loop on hook)
Keep working in pattern over remaining stitches on row or round.
REP
REPEAT
Referenced in pattern when you need to repeat certain instructions.
REV HDC
REVERSE HALF DOUBLE
YO, Insert hookin next st to the right, draw
up a lp (3 lps on hook), yo, draw through all 3 lps.
REV SC
REVERSE SINGLE
CROCHET (a/k/a CRAB STITCH)
A reverse single crochet is worked from left
to right; whereas a regular single crochet stitch is worked from right
to left. Insert your hook into the stitch or space indicated, then yarn
over and pull up a loop. (You should have two loops on your hook.) Yarn
over and draw through both of the loops on your hook. This stitch takes
a bit of practice but the outcome is well worth the effort.
RICE STITCH
(a/k/a BULLION STITCH
a/k/a ROLL STITCH)
See Bullion Stitch above.
NO ABBREV.
ROLL STITCH
(a/k/a BULLION STITCH
a/k/a RICE STITCH)
Roll st
20: Wrap the thread 20 times around the hook, bring up a loop through
sc, thread over hook and draw through the coil on the hook, keep roll
straight, thread over and draw through loop on hook. Repeat this for
each roll.
The term "round" is used when a
pattern calls for working in a circle instead of a straight row.
VARIED ABBREV.
SHELL STITCH
A Shell Stitch just means that more than
one stitch (such as a double crochet) is worked in the same space.
Example:
If a pattern calls for a 5 dc shell then
you work 5 dc into the specified stitch.
If a pattern calls for a 9 tr shell then
you work 9 tr into the specified stitch.
To add a simple ruffled edge to a project...
attach yarn in any stitch, sc in same st, * ch 3, sc in next st. Repeat
from * around. Join with sl st, fasten off and weave in ends.
SC
SINGLE CROCHET
Insert your hook
into the stitch or space indicated, then yarn over and pull up a loop.
(You should have two loops on your hook.) Yarn over and draw through both
of the loops on your hook.
SINGLE CROCHET DECREASE
(a/k/a SINGLE CROCHET NEXT TWO STITCHES TOGETHER)
Insert hook in next stitch, draw up a loop, (two
loops on hook), insert hook in next stitch, draw up a lp (3 loops on hook), YO and
draw through all 3 loops.
Watch the video:
SC3TOG
a/k/a ScDec3Tog
SINGLE CROCHET THREE STITCHES
TOGETHER
Insert hook in next st, draw up a lp, (two
lps on hook),
insert hook in next st, draw up a lp (3 lps on hook),
insert hook in next st, draw up a lp (4 lps on hook)
YO and draw through all 4 lps.
(SC over ring)
SINGLE CROCHET
OVER RING
Working over ring, holding yarn in left hand
behind ring, insert hook under/inside ring, yo, draw up a lp to the top
of the ring, yo, draw through both lps on hook.
NOTE: This stitch is used in projects that
require plastic or metal rings.
You can also crochet over a ring made from
chains. Just chain as many as you'd like to use, join with a sl st to
form the ring and begin doing the Sc over ring stitch.
Use metal rings (the size of your choice)
and this stitch to make Photo Christmas Ornaments. Once you have the
ring filled with stitches, you can do 3dc in each sc to form a wavy
edge. Add a string to hang it and you have a cute ornament. To add the
photo, trim the photo to size and tape or hot glue it to the back of
the ornament.
(Yarn over, pull up a loop) 4 times, 9 loops on hook,
yarn over, pull thru 8 loops,
yarn over, pull thru 2 loops,
push puff to front of work, work next stitch in your pattern.
Watch the Video:
SK
SKIP
Skip the indicated stitches.
SL KNOT
(not a standard abbreviation)
SLIP KNOT
To begin to crochet you first need to make
a slip knot:
With the palm of your hand facing you--place
the end of the yarn across the palm of your hand from right to left and
back around to cross over your palm again laying it across the end of
the first strand of yarn. Now reach under both strands of yarn (from top
to bottom) and pull up the longest strand. Insert your crochet hook into
this loop and tighten to secure the knot.
When you see the abbreviation "tog"
in a pattern you will be instructed to work a decrease over the indicated
stitches.
TR
or
TC
TREBLE CROCHET
(Also known as Triple Crochet)
Yarn over twice, then insert your hook into
the stitch or space indicated.
Yarn over and pull up a loop. (4 loops on
hook.)
Yarn over and draw through 2 loops. (3 loops on hook.)
Yarn over and draw through 2 loops. (2 loops on hook.)
Yarn over and draw through two loops.
(this is already listed on this page as TREBLE
NEXT TWO STS TOG but I had a viewer ask about a treble decrease so I'm
listing this stitch again in different terms.) Work a treble in the next stitch (without completing the last step) Work a treble in the next stitch (without completing the last step) Now yarn over and draw through all loops on the hook.
Yo twice, insert hookin next st, yo &
draw through lp, yo & draw through 2 lps, yo & draw through 2
lps, (2 lps on hook)
yo twice, insert hookin next st, yo & draw through
lp, yo & draw through 2 lps, yo & draw through 2 lps, (3 lps on
hook)
yo and draw through all 3 lps.
Work a TR in the next stitch without completing
the very last step (leave the last two loops on the hook)
TR in the
next stitch without completing the last step. You should have three loops
on the hook.
TR in the
next stitch without completing the last step. You should have FOUR loops
on the hook.
TR in the
next stitch without completing the last step. You should have FIVE loops
on the hook.
Yarn over and draw through all the loops.
Decrease made.
TR-SPL
TREBLE-SPLIT
Work 1 treble in
stitch, then 1 double crochet through 2 threads on the side of the treble.
TR-Y
TREBLE-Y
Work 1 treble in
stitch, chain 1, then work 1 double through 2 threads on the side of the
treble.
NO ABBREV.
TRINITY
STITCH
Row 1: sc in second
from hook,
insert hook in same ch & pull up a loop,
(insert hook in next ch & pull up a loop) twice,
YO & draw through all 4 loops on hook,
* ch 1, insert hook in same ch & pull up a loop,
(insert hook in next ch & pull up a loop) twice,
YO and draw through all 4 loops on hook,
repeat from * across,
sc in last stitch.
Row 2 : ch 1, turn.
sc in first sc & pull up a loop,
(insert hook in next stitch & pull up a loop) twice,
YO and draw through all 4 loops on hook,
* ch 1, insert hook in same stitch & pull up a loop,
(insert hook in next stitch & pull up a loop) twice,
YO & draw through all 4 loops on hook,
repeat from * across,
sc in same sc as last stitch.
Wrap the yarn over the hook and
draw the yarn through to form a new loop
Ch
Slip Stitch (sl st)
Insert the hook into the work as
indicated, wrap the yarn over the hook, draw the yarn through
the work and the loop on the hook in one movement.
Sl st
Double Crochet (dc)
Insert the hook into the work, yarn
over the hook and draw the yarn through the work only, yarn
over hook draw the yarn through both loops on the hook.
Sc
Half Treble (htr)
Wrap yarn over hook and insert the
hook into the work, yarn over the hook draw through work, yarn
over hook draw through all 3 loops in the hook.
Hdc
Treble (tr)
Wrap yarn over hook and insert the
hook into the work, yarn over the hook draw through work, yarn
over hook draw through first 2 loops, yarn over hook, draw through
last two loops.
Dc
Half Treble
Yarn over and insert your hook into
the stitch or space indicated, yarn over again and pull up a loop.
(You should have three loops on your hook.) Yarn over again and
draw through all three of the loops on the hook.
Hdc
Double Treble (dtr)
Wrap the yarn over the hook twice
and insert the hook into the work, yarn over hook draw through
work, yarn over hook, draw through first two loops, yarn over
hook draw through next two loops, yarn over hook draw through
last two loops.
Tr
Miss
Miss or Skip means you don't work
a stitch in that particular stitch.
Skip
Triple Treble (ttr)
Wrap the yarn over the hook 3 times
and insert the hook into the work, wrap the yarn over the hook
draw through work, yarn over hook drawn through first two loops,
yarn over hook draw through next two loops, yarn over hook draw
through next two loops, yarn over hook draw through last two
loops.
Dtr
Tension
Tension or Gauge refers to how loose
or tight you crochet your stitches. Some patterns list measurements
for a certain number of stitches and/or rows. This tells you if
your tension or gauge meets what is recommended for your pattern.
If not, adjust your hook size accordingly.
You can steam block afghan
squares by placing a cloth over the square and steaming it with an iron. Do not press it... just work with the
steam and then let the square lay
flat until it cools. Be sure to use a cloth between the iron and the finished piece and be extra careful if you
decide to block "acrylic" yarn items
as it could melt if overheated. Some people block by just steaming over the piece without actually touching
the iron to the project but if you
decide to actually press the iron onto your project I suggest testing a scrap swatch first.
You
can block a crocheted piece by wetting it thoroughly.
Then remove the excess water (I like to spin it in the washer).
Shape the piece, pinning if needed, and then let it air
dry.
CAMEL CROCHET - There's not
alot of information available online in regard to Camel Crochet as this
is a technique for which the name has been trademarked.
"Though I've never tried it I do
know a little about this method of crochet. On the first row, you do stitches in the
hump (hence the name camel crochet) of the chain instead of the top loop. This
is what makes it look knitted. "
Lisa
Free Form Crochet
doesn't require a "pattern".
You make a crocheted fabric using any stitch or combination of stitches
you want.
You can read more here: http://www.freeformcrochet.com/
Cut several pieces
of yarn approximately 12-14 inches long (you can experiment to get the
length you want). Insert hook in the stitch. Fold all strands of yarn
in half. Using the hook, draw the folded ends of the yarn up through
the stitch and pull the loose ends through the folded end. This completes
a fringe and all you need to do is tighten up the knot by pulling on
the strands of yarn. Continue with this method until you have added
all of your fringe. You can trim the ends even with scissors after all
fringes are added.
When I tie on a new color sometimes I tie a
knot (not recommended by most
crocheters as it leaves a little bump in your work) and then I weave
in the
old color by working it back into the stitches of the same color. You
can
crochet right over the ends of the yarn tails if they are both the same
color. If not, crochet over the tail
of the color you are working with and
then use a different weaving method to weave in the old color that you
just
fastened off.
You can weave the old color in with a crochet
hook or a yarn needle. The
yarn needle is quicker and you can weave
the strand in without disturbing
the stitches.
"I love the
newsletter and tips. Is there a section that gives you the explaination
of the laundry codes on all yarn labels? I found this one on the Lion
Brand Yarn site and now I know what each symbol means. " http://cache.lionbrand.com/yarnCare.html
Sherry
Designers implement the technique of crocheting with multiple strands in order to add thickness to a project when needed. Potholders are often made with the multiple strand technique.
When a crochet pattern calls for working with more than one strand of yarn at once. Hold the required number of strands together as you crochet... treating all of the strands as one.
Note: Be extra careful when making the stitches to ensure each stitch is made with all of the strands.
If you have a pattern
that calls for a yarn that you don't have or cannot purchase any longer
you can use this website to enter yarn details and choose a different
yarn.
I used the "sugar
water" recipe to stiffen two flower girl baskets for my sister in law's
wedding.
It worked great... however the solution is very HOT so be CAREFUL to
let it cool
enough before you try to put your hands in it - it could blister your
skin !
Once you complete
your last stitch on a project you will have one loop on your hook.
Cut the yarn leaving about a 4-6" tail to be woven in.
Yarn over, draw the yarn tail completely through the loop, and pull
it tight.
This secures the yarn so the project doesn't unravel.
Now you need to weave in the yarn tail using
a crochet hook or a yarn needle.
The yarn needle is quicker and you can weave the strand in without disturbing
the stitches.
HOW TO JOIN GRANNY SQUARES BY WHIP STITCHING THROUGH INNER LOOPS
WHIP STITCH
Can be used as a decorative element/embellishment or to join crochet pieces.
Using a length of yarn and a yarn needle, insert the yarn needle through the crochet fabric from front to back (or back to front) working along the edge. For each new stitch always insert the yarn needle from the same direction. When joining motifs, whip stitches can be worked into both loops, inner loops, outer loops, etc.
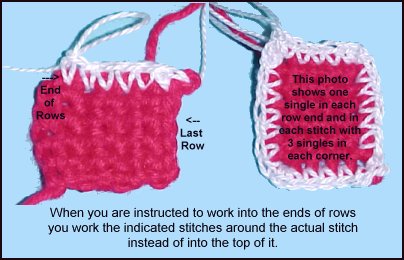
WORKING IN ROW ENDS
Sometimes a pattern has you work rows of
stitches and then to form a border or edging
you are instructed to "work in the
row ends". The row ends are the first & last stitches you did
on each row. If the rows are single
crochet stitches then the "end of the row" refers to
making the required stitches around the
first & last single crochet stitches on each row.
If the first & last stitches on the
row are double crochet stitches you work around the post of the double crochet stitches. No matter what
kind of stitch you are using you
work around the actual stitch on the end of the row... not into the
top of it.
The first photo in the following picture
shows a swatch turned on its side
with the ends of the rows on the top. I
used a white cotton thread to work into the
row ends so you could see where the stitches
go. The second photo shows the entire
piece with a border added. I worked one
single crochet into each row end, one single
into each unworked loop of the foundation
chain, one single in each row end up the opposite
side, and one single in each stitch on the
last row I had made. For each corner I worked
3 singles so the motif wouldn't curl up.
WORK OVER
Some patterns use more than one color of yarn. If a pattern instructs you to drop one color of yarn and "work over" it with a new color... lay the unused color yarn along the top of the stitches of the previous row/round and crochet over them as you go.
YARN BUTTERFLY
Using Yarn Butterflies or Yarn Bobbins helps to tame a project that contains multiple colors.
Yarn butterflies are great when you do not have any yarn bobbins.
Hold the yarn tail in between two fingers, letting the end rest along the back side of your hand.
Wind the yarn in a figure eight between your thumb and pinky finger until you have as much as you think you will need.
Clip the yarn leaving a 4-5 inch tail. Wrap that yarn tail around the center of the figure eights a few times, then loop the yarn tail back through the wraps. Pull to secure it. The yarn tail you began with (the one you left resting along the back side of your hand) is the working end. Pull on that end to release more yarn as you need it.