Free Crochet Patterns from Crochet N More
| Free Newsletter Four New free crochet patterns each month. Delivered twice a month. |
||
The Dog House Help Us Out CE Links
|
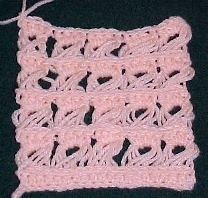
BROOMSTICK LACE AFGHAN SQUARE Crochet Pattern Crochet pattern courtesy
of Crochet 'N' More To
print a new copy visit:
The following pattern is my original design. A big thanks to Frances for letting me know that I failed to mention that
MATERIALS: Hook: Size G & Broomstick or Large Knitting Needle Yarn: Red Heart Super Saver Stitches used: ch, sl st, sc, hdc. Difficulty: MEDIUM (I've added illustrations after certain steps to help you with this pattern) ROW 1: Ch 21, hdc in 3rd ch from hk and in each ch across. Ch 1, turn. ROW 2: Draw the ch 1 lp up and over the broomstick (hook empty). * Insert hk into next st and draw up a lp and place it over the broomstick. Rep from * across. (20 lps). (See Illustration 1)
ROW 3: Slide 4 lps off of the broomstick.
ROW 4: Rep Row 2. ROW 5: Rep Row 3. ROW 6: Rep Row 2. ROW 7: Rep Row 3. Row 8: Rep Row 2. Row 9: Rep Row 3, except ch 2 and turn.
ROW 10: Hdc in each hdc. Ch 1, turn. EDGE: RND 1: Sc in each hdc across to corner. (Sc, ch 1, sc, ch 1, sc) in the corner. Working down the side, evenly space 18 sc. (I placed 3 around the ends of the broomstick loops and one in the ends of some of the rows) Work corner same as before. Sc in each st across bottom. Evenly space 18 sc up the other side being sure to end with the corner stitch sequence. NOTE: If your tension causes the square to pucker up down the side when you do this step all you need to do is add extra stitches. RND 2: Hdc in each st. (Hdc, ch 1, hdc, ch 1, hdc) in each corner sp. Join with a sl st to the top of the first hdc. FASTEN OFF. WEAVE IN ENDS HAPPY CROCHETING
Back to the free crochet patterns directory For stitch abbreviations and instructions please visit our Crochet Basics page:
|
|||||||||||


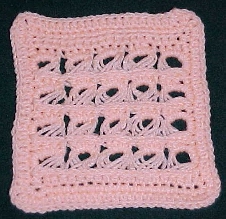
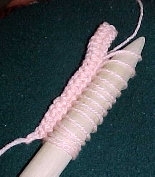
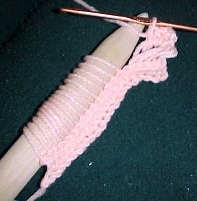
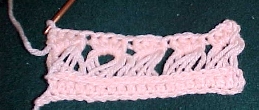 Illustration 3