Click for the Crochetnmore home Page

Free Crochet Patterns from Crochet N More

Free Newsletter
Four New free crochet patterns each month. Delivered twice a month.

Enter Email Address to subscribe to our Newsletter:


Patterns we Sell
Our Newest Patterns
Free Pattern Directory
Our Blog
About Us
Advertise
Crochet Basics
Crochet Tips
Crochet Links
Crochet Supplies
How to read a pattern
Help Me Crochet
Knitting Links
Buy our patterns
Newsletter Archive
Contests
Our Amazon Books
Crochet Resources
Message Board
Visit our T-Shirt Shop
Craft Books
Our Videos

Donate to CNM

Check Out

The Dog House
The Scratching Post

Jesus First
My Testimony
Prayer List
Bible Trivia
Do You Know Jesus?
Ten Commandments

Help Us Out

Donate to CNM
Link To Us

CE Links
Charity Links
Cool Links
Awards

Privacy Policy
Contact Us
Site Map

On Sale Now at Joann.com 


Crochet Patterns | Afghans | Air Fresheners | Baby | Bath | Bookmarks | Coasters & Doilies | Dolls & Accessories
Hair & Fashion Accessories | Holiday | Kitchen | Knit Patterns | Miscellaneous | Pets | Religious


Follow Crochetnmore on Twitter Follow us on Facebook


KNITTED BABY SOCKS
BY GAIL THOMAS

Crochet pattern courtesy of Crochet 'N' More
Click below to learn more about CNM:
http://www.crochetnmore.com
Copyright
Tisa Enterprises, All Rights Reserved

To print a new copy visit:
http://www.crochetnmore.com/knittedbabysocksbygailthomas.htm


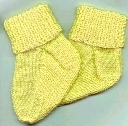
The following pattern is an original design by Gail Thomas of Gail's Crafting Design Services.
Please only copy or print this pattern for personal use.
Please contact Gail Thomas if you have questions regarding this pattern.

Materials:
For this size (toddler 4-1/2" from heel to toe), I used baby weight yarn; 1 skein (1.75 ozs.) made 2 pairs; size 4 straight knitting needles.

Cast on 41 sts. Work in k 1, p 1 ribbing for 30 rows.

Start heel: Knit 11 sts, turn, work in stockinette st (k 1 row, p 1 row) for 16 row, ending with a p row, turn.

Next row: K 2, k 2 tog, k 1, turn, sl 1, p 3, turn.
Next row: Purl.
Next row: K 3, k 2 tog, k 1, turn, sl 1, p 4, turn.
Next row: Purl.
Next row: K 4, k 2 tog, k 1, turn, sl 1, p 5, turn.
Next row: Purl.
Next row: K 5, k 2 tog, k 1 - 7 sts on needle.
Next row: Purl.

2-Needle Socks (continued) . . .

Using left needle, pick up 10 sts along side of heel (the trick to making this heel look good, is to pick up these sts along side evenly spaced & knit them very tight), knit them, then continue across 19 center (instep) sts. Work stockinette st on remaining 11 sts for 17 rows, ending with a knit row. Work this half of heel as follows:

Next row: P 2, p 2 tog, p 1, turn, sl 1, k 3, turn.
Next row: Knit.
Next row: P 3, p 2 tog, p 1, turn, sl 1, k 4, turn.
Next row: Knit.
Next row: P 4, p 2 tog, p 1, turn, sl 1, k 5, turn.
Next row: Knit.
Next row: P 5, p 2 tog, p 1 - 7 sts on needle.

Using left needle, pick up 10 sts along side of heel (the trick to making this heel look good, is to pick up these sts along side evenly spaced & purl them very tight), purl them, then continue purling across all sts.

Next row: K 15, k 2 tog, k 19, sl 1, k 1, pass sl st over (psso), k 15.
Next row: Purl.
Next row: K 14, k 2 tog, k 19, sl 1, k 1, psso, k 14.
Next row: Purl.
Next row: K 13, k 2 tog, k 19, sl 1, k 1, psso, k 13.
Next row: Purl.
Next row: K 12, k 2 tog, k 19, sl 1, k 1, psso, k 12.
Next row: Purl.
Next row: K 11, k 2 tog, k 19, sl 1, k 1, psso, k 11.
Next row: Purl.
Next row: K 10, k 2 tog, k 19, sl 1, k 1, psso, k 10.
Next row: Purl: 41 sts on needle.

2-Needle Socks (continued) . . .

Work even in stockinette st for 10 rows (or 2 inches shorter than desired foot length - from heel to toe) ending with a purl row.

Toe Shaping:

Next row: K 8, k 2 tog, k 2, sl 1, k 1, psso, k 13, k 2 tog, k 2, sl 1, k 1, psso, k 8.
Next row: Purl.
Next row: K 7, k 2 tog, k 2, sl 1, k 1, psso, k 11, k 2 tog, k 2, sl 1, k 1, psso, k 7.
Next row: Purl.
Next row: K 6, k 2 tog, k 2, sl 1, k 1, psso, k 9, k 2 tog, k 2, sl 1, k 1, psso, k 6.
Continue decreasing in same way, until 17 sts remain. Leaving sts on needle, cut yarn leaving short tail, then use a crochet hook to pull tail through rem sts & remove needle. Pull sts tightly, then pull tail through opposite beginning st and secure. I did it this way, so the toe doesn't have any bumps or uneven edge.

The trick to having a flat seam:
Using an iron, press edges flat, as knitted edges always have a tendency to curl under. Then I used a matching needle & thread to sew seam together, making sure that I just caught 1 strand of yarn from each edge, and not pulling extremely tight. This will keep your edge smooth & flat.

Using same needle & thread, sew any loose yarn ends in place, fold top of sock over, and you have a darling pair of sockies for a little one!

This pattern also works great for larger socks. You can make the ribbing longer, foot length longer, use a heavier yarn, larger needle, etc.


HAPPY CROCHETING


Back to the free crochet patterns directory

For stitch abbreviations and instructions please visit our Crochet Basics page:
http://www.crochetnmore.com/123basics.htm
Please email me for information on stitches that are not included on that page.


Free Crochet Patterns About Us separator    Our Blog Twitter   Our Site Map   Contact Us Facebook

Copyright 1998-2010 Tisa Enterprises / Crochet N More.com