Click for the Crochetnmore home Page

Free Crochet Patterns from Crochet N More

Free Newsletter
Four New free crochet patterns each month. Delivered twice a month.

Enter Email Address to subscribe to our Newsletter:


Patterns we Sell
Our Newest Patterns
Free Pattern Directory
Our Blog
About Us
Advertise
Crochet Basics
Crochet Tips
Crochet Links
Crochet Supplies
How to read a pattern
Help Me Crochet
Knitting Links
Buy our patterns
Newsletter Archive
Contests
Our Amazon Books
Crochet Resources
Message Board
Visit our T-Shirt Shop
Craft Books
Our Videos

Donate to CNM

Check Out

The Dog House
The Scratching Post

Jesus First
My Testimony
Prayer List
Bible Trivia
Do You Know Jesus?
Ten Commandments

Help Us Out

Donate to CNM
Link To Us

CE Links
Charity Links
Cool Links
Awards

Privacy Policy
Contact Us
Site Map

On Sale Now at Joann.com 


Crochet Patterns | Afghans | Air Fresheners | Baby | Bath | Bookmarks | Coasters & Doilies | Dolls & Accessories
Hair & Fashion Accessories | Holiday | Kitchen | Knit Patterns | Miscellaneous | Pets | Religious


Follow Crochetnmore on Twitter Follow us on Facebook


HANGING TISSUE COVER
Crochet Pattern

Crochet pattern courtesy of Crochet 'N' More
Click below to learn more about CNM:
http://www.crochetnmore.com
Copyright
Tisa Enterprises, All Rights Reserved

To print a new copy visit:
http://www.crochetnmore.com/hangingtissuecover.htm


The 
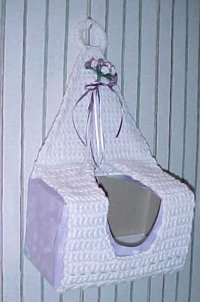
following pattern is my original design.
Please only copy or print this pattern for personal use.
Please contact me if you find any errors.

MATERIALS:

Red Heart Yarn - 4 ply ww (less than 8 ounces)
Hook Size J
2" Craft Ring
Large Box of Tissue (Puffs is what I use)
Minature flowers and ribbon for embellishment (You can use whatever you want)

Stitches: ch, sc, sc2tog, sl st.

Difficulty:  MEDIUM/DIFFICULT


R1: Holding two strands tog. Ch26, working in the hump of ea ch. Sc in the hump of the 2nd ch from the hook. Sc in the hump of ea rem ch. (25sc)

R2: Ch1, turn. Sc in ea sc. (25sc)

R3: [Eyelet Row] Ch1, turn. Sc in same st. (Ch1, sk next sc, sc in next sc) across
(13sc & 12 ch1 sps)

R4: Ch1, turn. Sc in ea sc and in ea ch1 sp.

R5: Rep R2

 [  ] R6: Rep R3
 [  ] R7: Rep R4
 [  ] R8: Rep R2
 [  ] R18: Rep R3
 [  ] R19: Rep R4
 [  ] R20: Rep R2
 [  ] R30: Rep R3
 [  ] R31: Rep R4
 [  ] R32: Rep R2
 [  ] R9: Rep R3
 [  ] R10: Rep R4
 [  ] R11: Rep R2
 [  ] R21: Rep R3
 [  ] R22: Rep R4
 [  ] R23: Rep R2
 [  ] R33: Rep R3
 [  ] R34: Rep R4
 [  ] R35: Rep R2
 [  ] R12: Rep R3
 [  ] R13: Rep R4
 [  ] R14: Rep R2

 [  ] R24: Rep R3
 [  ] R25: Rep R4
 [  ] R26: Rep R2

I put this in columns
with check boxes
to make it easier
for you.
 [  ] R15: Rep R3
 [  ] R16: Rep R4
 [  ] R17: Rep R2
 [  ] R27: Rep R3
 [  ] R28: Rep R4
 [  ] R29: Rep R2

Do Not Fasten Off.

RIGHT SIDE FRONT
Begin front shaping by working short rows.

R1: Ch1, turn. Sc in 9 sts. (this is the right side)

R2: Ch1, turn. Sc2tog. Sc in ea rem st. (8sts)

R3: Ch1, turn. Sc in ea st. (8sts)

R4: Rep R2 (7sts)

R5-14: Rep R3 (7sts)

R15: Ch1, turn. Sc in ea st across to last. 2sc in the last st. (8sts)

R16: Rep R3

R17: Rep R15 (9sts)

R18: Rep R3 (9sts)

R19: Rep R15 (10sts)

R20: Rep R3 (10sts)

R21: Rep R15 (11sts)

R22: Rep R3 (11sts)

Fasten Off. (When you fasten off you are on the right side, on the outside edge of the piece)

--------------------------------------------------------

LEFT SIDE FRONT
Continue front shaping... with Right Side facing and working short rows on the left side.

R1: Join yarn with sl st in the 9th st to the right of the left side edge. Sc in same st and in ea rem st. (9sc)

R2: Ch1, turn. Sc in ea st across ot last two sts. Sc2tog. (8sts)

R3: Ch1, turn. Sc in ea st. (8sts)

R4: Rep R2 (7sts)

R5-14: Rep R3 (7sts)

R15: Ch1, turn. 2sc in 1st st. Sc in ea rem st (8sts)

R16: Rep R3 (8sts)

R17: Rep R15 (9sts)

R18: Rep R3 (9sts)

R19: Rep R15 (10sts)

R20: Rep R3 (10sts)

R21: Rep R15 (11sts)

R22: Rep R3 (11sts)

Fasten off
(The fasten off point on this part is the right side of the last short row on the left side)

JOINING
Holding the foundation row edge (in behind) tog with the last row of the Right Front (in the front), keeping corresponding sts aligned, join with a sl st through the first stitch on both rows.
Ch1, sc through corresponding sts of all 11 sts of Right Front. Sc in next 3 sts on Foundation row only (the back part) Working through corresponding sts on Foundation row and Left Front, sc in all 11 sts. (25sts)

BACK
R1: Ch1, turn. Sc in ea st.

R2: Sc2tog. Sc in 21 sts. Sc2tog (23sts)

R3: Rep R1.

R4: Rep R2 (21 sts)

Repeat Row 1 and Row 2 until you have 7 sts left.

Last Row: Ch1, turn. Sc in first st. Sc in next 5 sts, while working over the 2" ring. Sc in the last st.
Ch1, turn. (Sl st in ring, ch1) until the ring is filled. Sl st in the first sc made on this row.

Fasten Off.

FINISHING:
Add the Flowers and Ribbon as an embellishment. If you don't like flowers, a ribbon bow would work great.
You could even crochet an edging around the entire piece in a coordinating color of the room you intend to use it in.


HAPPY CROCHETING


Back to the free crochet patterns directory

For stitch abbreviations and instructions please visit our Crochet Basics page:
http://www.crochetnmore.com/123basics.htm
Please email me for information on stitches that are not included on that page.


Free Crochet Patterns About Us separator    Our Blog Twitter   Our Site Map   Contact Us Facebook

Copyright 1998-2010 Tisa Enterprises / Crochet N More.com