Free Crochet Patterns from Crochet N More
| Free Newsletter Four New free crochet patterns each month. Delivered twice a month. |
||
The Dog House Help Us Out CE Links
|


Crochet pattern courtesy
of Crochet 'N' More To print a new copy
visit:
The
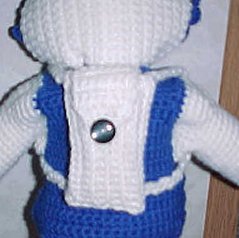
following pattern is my original design. MATERIALS: Red Heart
Super Saver - 4ply WW (off white) Stitches: ch, sc, sl st, sc2tog. Difficulty: EASY/MEDIUM R1: Ch16: Sc in 2nd ch from hook. Sc in ea rem ch. (15sc) Rs2-18: Ch1, turn. Sc in BL only of ea st. JOIN Ch1, turn. Holding R18 in
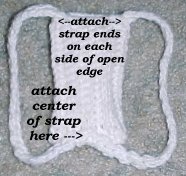
front, fold R1 up behind R18. Line up corresponding sts and sl st them tog. Do not fasten off. EDGE FOR ENDS Ch1, working around the opening into the row ends, sc in ea row end. Join with sl st. Fasten off. Reattach yarn in any st on the other end and repeat. After you join with a sl st, fasten off leaving about 12" of yarn to use for sewing. Fold the end flat and sew the corresponding sts tog. STRAPS R1: Leaving a length of yarn for sewing later.... ch2, sc in 2nd ch from hook. R2: Ch1, turn. Sc in sc. Rep R2 until the strap is
about 19" long. ATTACHING STRAP Fold the strap in half to
find your center point, place a marker. FLAP With straps facing you,
attach yarn in the first unworked stitch on the open edge, (to the left of the
strap on the right). Rs2-7: Ch1, turn. Sc in ea st. R8: Ch1, turn. Sc2tog. Sc across to last 2 sts. Sc2tog. (5sts) R9: Rep R8. (3sts) R10: Ch1, turn. Sc in first
st. Ch2, sk next sc, sc in last st. Fasten Off. FINISHING: Position button where it will match up with the button hole and sew it on. HAPPY CROCHETING
Back to the free crochet patterns directory For stitch abbreviations and instructions please visit our Crochet Basics page:
|
|||||||