BOOK CLUTCH

Crochet pattern courtesy of Crochet 'N' More
Click below to learn more about CNM:
http://www.crochetnmore.com
Copyright, January 14-15, 2008
Tisa Enterprises, All Rights Reserved

To print a new copy visit:
http://www.crochetnmore.com/bookclutch.htm

Book Clutch Crochet Pattern

Measures
10-3/4" x 6-1/4"


The 
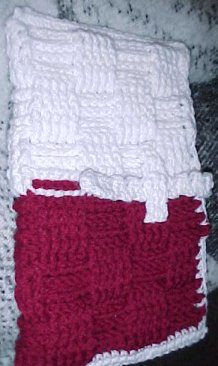
following pattern is my original design.
Please only copy or print this pattern for personal use.
Please contact me if you find any errors.

MATERIALS:

Red Heart 4 ply WW Yarn (burgundy and white)
Hook Size I

Stitches: ch, sl st, sc, dc, fpdc, bpdc.

FPDC

FRONT POST DOUBLE CROCHET

(a/k/a
Front Raised
Double Crochet)

Yarn over, insert hook from the front side of the work right to left around the post of the indicated stitch on a previous row;
yo and pull up a loop (3 lps on hk)
yo and draw through two lps (2 lps on hk)
yo and draw through two lps (1 lp on hk)

Illustrations

BPDC BACK POST DOUBLE CROCHET Yarn over, insert hook from the back side of the work right to left around the post of the indicated stitch on a previous row;
yo and pull up a loop (3 lps on hk)
yo and draw through two lps (2 lps on hk)
yo and draw through two lps (1 lp on hk)

Illustrations

Difficulty:  MEDIUM


R1: With burgundy, ch47. Dc in the 4th ch from the hook. Dc in ea rem ch. (45dc)

R2: TURN. Sl st around front of post of first st. Ch3. Fpdc around next 4sts.
(Bpdc around 5 sts.
Fpdc around 5 sts.) across.

R3: TURN. Sl st around back post of first st. Ch3.
Bpdc around next 4sts. (Fpdc around 5 sts. Bpdc around 5 sts).

R4: Rep R2.

Reverse the weave every four rows.

R5: Rep R2.
R6: Rep R3.
R7: Rep R2.
R8: Rep R3.

REVERSE THE WEAVE

R9: Rep R2.
R10: Rep R3.
R11: Rep R2.
R12: Rep R3.

REVERSE THE WEAVE
Change to white.

R13: Rep R2.
R14: Rep R3.
R15: Rep R2.
R16: Rep R3.

REVERSE THE WEAVE

R17: Rep R2.
R18: Rep R3.
R19: Rep R2.
R20: Rep R3.

REVERSE THE WEAVE

R21: Rep R2.
R22: Rep R3.
R23: Rep R2.
R24: Rep R3.

EDGE: Ch1, turn. Sc evenly around entire piece, placing 3sc in ea corner.
Do not fasten off!
Fold the row ends together and sl st corresponding sts tog along the side using white yarn.
Fasten off.

Reattach white yarn on other side and do the same.
Fasten off.

FLAP

R1: Ch3, sc in 2nd ch from hook and in the last ch. (2sc).
R2: Ch1, turn. Sc in ea st.
Rep R2 for 17 rows more.
Hold the centered flap along the side and single crochet the flap to the pouch as seen in the photo.

LOOP

R1: Ch3, sc in 2nd ch from hook and in the last ch. (2sc).
R2: Ch1, turn. Sc in ea st.
Rep R2 for 6 more rows.
Sew to front of the clutch as shown in the photo.


For stitch abbreviations and instructions please visit our Crochet Basics page:
http://www.crochetnmore.com/123basics.htm
Please email me for information on stitches that are not included on that page.

HAPPY CROCHETING

FREE Online Assistance Available

BACK TO THE FREE PATTERNS PAGE

Google
Web Crochet 'N' More